100 Days of PowerBuilder – Tutorial – Day 3: Window Properties
This is part of my project ‘100 Days of PowerBuilder’ which is a series of discussions focused on basic PowerBuilder development.
Note: This article is written with examples created in PowerBuilder 2019 R3. The same steps would be pretty close with any version going back to 9.
Continuing with the window we created on Day 2 (w_main), lets look at some of the various properties associated with it. Locate the window on the system tree and double click on it. This should ‘open’ it in what is called a ‘painter’. I call this type an ‘Edit Painter’ but it is also referred to as a ‘Window Painter’ since the object we are working on is a window.
Painters have a ‘view’ menu that can be used for opening various views. Each painter has a default layout of views which can be rearranged or hidden to suit your needs. You are able to save your personal layout of views using the ‘View – Layouts – Manage’ menu option. Remember ‘View – Layouts – (Default)’ option as this can save you a bunch of frustration when you jumble things up and close stuff you really want to see.
Anyway, we are looking for the Properties View of our window. In the default layout it is on the right side of the IDE and should look something like this:

Title – the title of the window; normally displayed in the window’s TitleBar
set in code: w_main.title = ‘100 Days of PowerBuilder’
Tag – this is often used to set the ‘microhelp’ area of a MDI frame. It can also be used to provide custom functionality based on it’s content. To set in code: w_main.tag = ‘Main application window’
MenuName – the name of the menu object associated with the window
Visible – can the window be seen?
Enabled – controls whether the window can have focus. boolean value (TRUE/FALSE) If this is FALSE (not checked) and is the main starting window of your application, when you run the app nothing will happen.
TitleBar – always TRUE for Main widow types.
ControlMenu – controls whether the Control Menu box displays in the TitleBar
MaxBox – controls whether the Maximize box displays in the TitleBar
MinBox – controls whether the Minimize box displays in the TitleBar
ClientEdge – Does the client area of the window appear sunken within it’s frame
PaletteWindow – used for Popup windows.
ContextHelp – used for Response windows.
RightToLeft – if the operating system supports right to left display, specifies how the characters should be displayed.
Center – causes the window to be centered when created
Resizable – is the window able to be resized?
Border – does the window have a border (TRUE if window type Main).
WindowType – This is set at design time and cannot be changed during runtime.
WindowState – specifies the window state when opened (Max, Min, or as designed)
BackColor – the background color
MDIClient Color – only for MDI frames
Icon – the icon displayed in the titlebar.
Transparency (%) – 0 – 100 value with 0 being totally opaque
OpenAnimation – how the window opens
CloseAnimation – how the window closes
AnimationTime(ms) – animation time in miliseconds – related to Open/Close animations
WindowDockState – relates to MDI applications and how the window appears
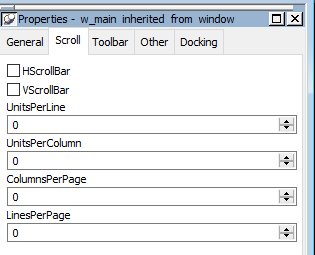
The Scroll tab contains settings used if the windows display area is smaller than the layout of the controls within it. The HScrollBar and VScrollBar settings allow the user to move around to see all of the window contents if needed.

The Toolbar tab is used to control the Toolbar in MDI frame windows.
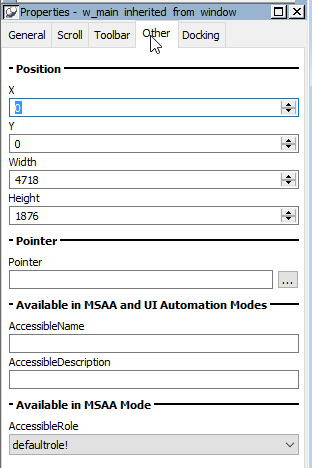
These settings control the windows dimensions, initial position on the screen, pointer image, and user accessibility.
Position
X – The horizontal coordinate of the window where the upper right corner of the display is zero (0).
Y – The vertical coordinate of the window where the upper right corner of the display is zero (0).
Width – The width of the window. This dimension starts from the X position.
Height – The height of the window. This dimension starts from the Y position.
Pointer
Pointer – The image displayed when the pointer is over the window.
Accessibility
These properties are used when designing applications in compliance with various standards regarding use by individuals with disabilities. More information can be found in the Appeon PowerBuilder Help Guide.

As of PowerBuilder 2019 R2 Docking is obsolete.
Notes on the above properties
The various properties which have check boxes next to them are all boolean values (TRUE/FALSE).
Many of the drop down lists show Enumerated Values which are specific to PowerBuilder.
All window measurements are in PowerBuilder units (PBUs). A PBU is defined in terms of logical inches. The size of a logical inch is defined by the operating system (OS) as a specific number of pixels. The number is dependent on the display device. Windows typically uses 96 pixels per logical inch for small fonts and 120 pixels per logical inch for large fonts.
The window coordinates system can take a bit of getting used to since the Y position is opposite of what is taught when you learn about Cartesian coordinates. Also remember that quite often you will need to convert positions into Pixels when interacting with the OS; naturally there are methods to convert PBUs to Pixels and vice versa.
For image file designations in general you can choose items from folders available to your PC during design time. When you do this, PowerBuilder will insert the full path into the specified setting (icon, pointer, etc.). You should always remove the file path from the entry, leaving only the file name. Any graphic resources should be placed in a common folder which is contained within the PATH on your PC. If you do not do this and someone else runs your application who has a different folder structure (or the file is no longer in the location specified), these images will be missing (some will display as a red X or just be blank).
These properties can easily be experimented with by changing them in the painter, saving, then running the application. You can even set the window to be invisible or disabled – just be prepared to bring up the task manager and kill the app since you won’t be able to get to the window.
![]()
Leave a Reply